

How to Install a Porch Railing or Balustrade System (Step-by-Step Guide)
Quick Answer: Installing a porch railing or balustrade involves layout marking, securing newel posts, mounting the bottom rail, spacing balusters (the 4-inch rule), and anchoring the top rail. While PVC systems are DIY-friendly, complex materials like synthetic stone or radius (curved) stairs typically require professional installation to ensure structural safety and code compliance.
Expert Insight
Based on experience manufacturing architectural products since 2001, the most successful installations come down to three factors: proper anchoring, precise layout, and patience during assembly

Flat installations are relatively straightforward, but stair and curved systems require additional steps such as angle matching, dry fitting, and multi-person placement of rails to ensure everything aligns correctly. Skipping these steps is one of the most common causes of installation issues.
Tools & Materials Needed
- ape measure and level (laser level recommended)
- Drill/driver or impact driver
- Structural anchors, screws, or mounting hardware
- Construction adhesive or caulking
- Balusters (spindles)
- Top and bottom rails
- Safety gear (gloves, eye protection)
Materials vary depending on your system — from lightweight PVC railings to heavier Balustrade systems requiring structural anchoring.
General Porch Railing & Balustrade Installation Steps
1. Measure and Mark the Layout
Measure the full length and height of the area. Mark post locations (typically 4–6 feet apart) and confirm spacing meets code requirements.
2. Install Posts or Base Supports
Secure posts into structural framing using proper anchoring methods such as rebar with epoxy or flange-mounted systems. The entire railing system depends on properly anchored posts.
3. Cut and Prepare Rails
Measure distances between posts and cut rails accordingly. Account for expansion and contraction where required. Use appropriate tools (miter saw, diamond blade, or grinder depending on material) and clean edges for a proper fit.
4. Install Balusters (Spindles)
Mark spacing carefully and drill holes into rails where required. Install balusters using screws, adhesive, pins, or brackets depending on the system.
5. Assemble the System
Set bottom rails first, followed by balusters, then carefully install the top rail. Larger sections may require multiple installers to position correctly.
6. Secure and Finish
Apply adhesive, install caps, secure fasteners, and complete final alignment. Some systems may include filling posts with structural material or applying caulking for a finished seal.
Real Installation Examples
Synthetic Stone Balustrade Installation
- Requires rebar or flange anchoring with epoxy
- Rails are cut, drilled, and assembled with balusters using adhesive and pin systems
- May include pouring structural material into posts for strength
- Final step includes caulking all joints and connections
Best for: Historic-style homes and high-end residential projects
Radius Stair Balustrade Installation
- Requires angle measurement using an angle finder
- Rails and balusters must be cut to match stair pitch
- Multiple dry fits are required before final installation
- Surface preparation ensures rails sit flat and align correctly
Best for: Custom staircases, curved layouts, and architectural entryways
PVC / Porch Railing Installation
- Uses structural posts with sleeves and mounting brackets
- Includes aluminum stiffeners for added strength
- Balusters are fastened with screws and supported with blocks
- Top rails are secured with adhesive and mechanical fasteners
Best for: Low-maintenance porches and DIY-friendly installations
Download Installation Guides & Resources
For detailed installation specifications, refer to:
- Polymer stone balustrade installation guide
- Urethane balustrade installation guide
- PVC railing installation guide
- Radius stair installation guide
Additional project resources:
Choosing the Right Material
- Balustrade systems — traditional appearance, more structural complexity
- PVC railings — lightweight, low-maintenance, easier installation
- Vinyl railings — similar to PVC, cost-effective and widely used for residential projects
- Aluminum railings — durable, modern appearance, often used for decks and balconies
Choosing the correct material early helps avoid installation challenges later.


What Affects the Cost of Porch Railing Installation
Because systems are custom-built, costs vary based on:
- Material type
- Project size and layout
- Stair or radius complexity
- Installation method (DIY vs professional)
Projects involving stairs or curved layouts require more precise cutting, alignment, and labor.
Can You Install a Porch Railing Yourself?
DIY installation is ideal for:
- Straight runs
- Lightweight systems
- Pre-engineered railing kits
Professional installation is recommended for:
- Heavy materials
- Stair or curved systems
- Structural installations
Baluster Spacing & Code Requirements
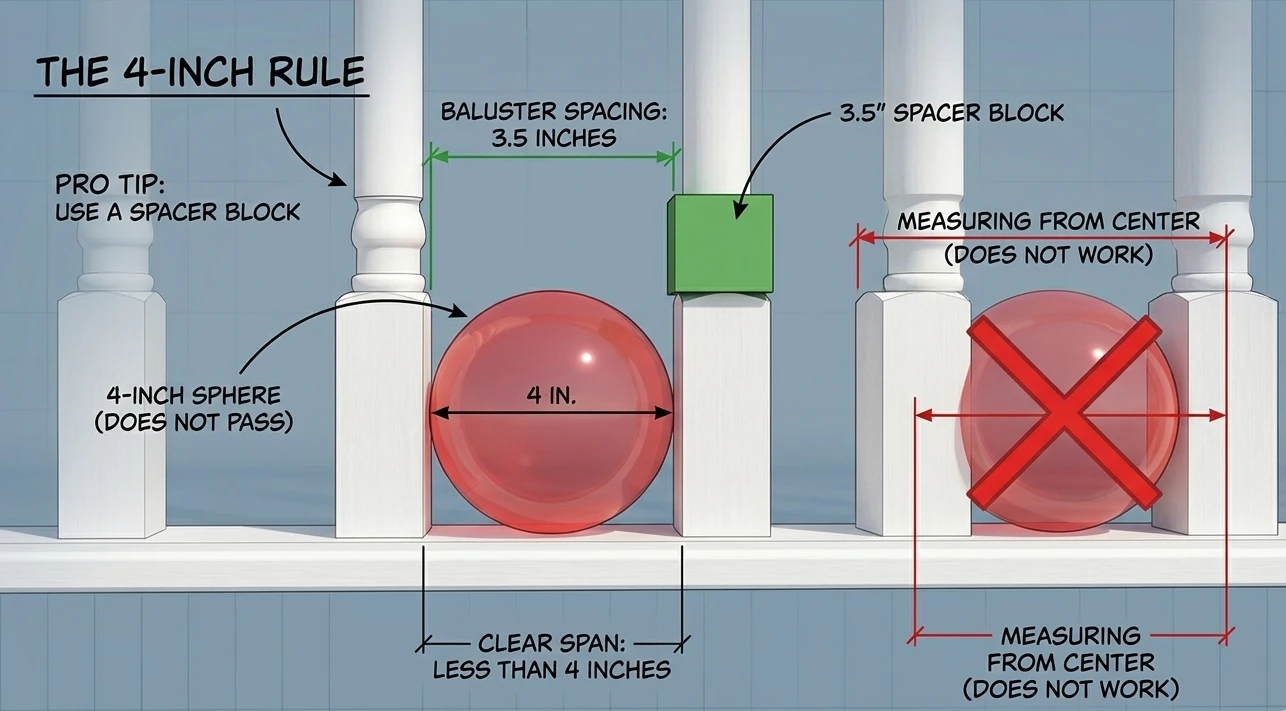
The 4-Inch Rule
Balusters must be spaced so that a 4-inch sphere cannot pass through.
Pro Tip
A common mistake is measuring 4 inches from the center of the baluster. Code requires a clear span of less than 4 inches between surfaces. Using a 3.5″ spacer block ensures consistent spacing and helps pass inspection.
Additional Requirements:
- Railing height typically 36″–42″
- Secure structural anchoring
- Proper handrail design for stairs
Common Installation Mistakes to Avoid
- Incorrect spacing
- Weak anchoring
- Poor alignment
- Skipping dry fitting
- Ignoring building codes
Balustrade vs Railing — What’s the Difference?
- Railing: Functional term used by homeowners
- Balustrade: Architectural system including rails, balusters, and posts


FAQ
How much does a custom balustrade system cost?
Because systems are custom-fabricated, pricing depends on material, size, and design. Requesting a quote early helps establish accurate project expectations.
Can I install balusters myself?
Yes, especially with modern pre-engineered systems.
What is the 4-inch rule for railings?
It ensures no opening allows a 4-inch sphere to pass through for safety.
How are balusters attached?
Using screws, adhesive, brackets, or pin systems depending on the material.
Should balusters be nailed or screwed?
Screws or structural fasteners are recommended for long-term durability.
Planning a Railing or Balustrade Project?
Choosing the right system involves more than installation — material selection, layout, and long-term performance all matter.
Email or call 877-279-9993
Send us photos or drawings, and we’ll help you select the right solution.


